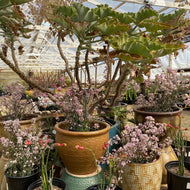
In order to garden successfully with plants growing on a wall, it is important to recognize the difference from traditional gardening. I never thought about gardening on the ground or in pots as gardening horizontally, but that is exactly what you are doing. Of course there are variations in the slope, but by and large, traditional gardening has been horizontal. Succulent plants are often found growing on cliffs in the crevices of rocks or on the cliff edges, clinging to what soil they can find purchase in. This ability to eke out a living in little soil makes them pretty good candidates for vertical gardening.
To accommodate plants growing on a wall, it is necessary to decide what kind of container would work best for the type of plants being used and for the structure the containers are being grown on. I have settled on two types of containers for vertical gardening with succulents. The first is a frame I developed in the early 1980’s. The frame is built like a picture frame with a wire mesh front.

This frame is designed for smaller applications where the individual frame is not built larger than about 18” x 24”. Once you exceed that size, the frame becomes awkward and needs quite a bit of modification to prevent things like soil slump. The most common sizes I have used in this type frame are 6x12, 12x12, 12x18, and 18x24. The depth of each of these is about 2”. Placing a grouping of these frames on a wall can solve the problem of attractively filling a larger wall space. These frames are low tech and do not incorporate watering systems, so they must be removed from the wall or hung on a hinge system to make it possible to flatten each frame for watering. The frames can be modified to accept a drip system, especially with today’s wide array of drip materials available.
The other system I use is a plastic panel 19.5”x19.5”x2.5”, specifically designed for vertical gardening. This is the high tech system, which is designed to accept drip and is scalable to whatever size is desirable. Each panel has 45 slanted pockets that allow water to flow from pocket to pocket. This frame anticipates some of the issues for vertical gardening on a large scale. Some of the primary issues would include uniform watering, soil slump, ease of mounting and ease of removal.
There are some differences and similarities when gardening with each of these types of frames, or systems. The following is an attempt to describe each system and how to use them from planting to hanging and maintenance.
Gardening with Robin’s Living Picture Frame
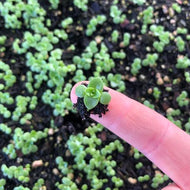
This style of frame is, planted with cuttings only. Because of the wire mesh front, rooted plants cannot be fit into the planting area. The idea is to fill the frame with succulent mix through the wire mesh.

Place succulent mix over screen in small amounts and gently move through screen by running your fingers over the screen and soil.

The tools. Clippers and a nail will work just as well. The fork or nail can also be used when a stem is difficult to push into the soil. Gently push the fork into the area where you want to insert the stem and it will make it easier to insert it into the hole. This is only necessary when the stem will not push in.

Using a fork or nail, carefully raise the screen to allow soil to fall through the screen. Pulling up too hard can result in pulling the screen out of the frame - be careful. While holding the screen up, use the other hand to repeat the process of moving the soil through the screen.
Once the frame is full, cuttings are placed on the top of the mesh. As roots form, they move into the soil behind the wire. Once fully rooted, the soil is held in place by the network of roots behind the wire. If properly planted, the plants cover the entire surface of the wire mesh, preventing soil erosion.
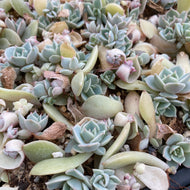
There are many varieties of succulents that work well in my living pictures. Historically, I have worked with rosettes 90% of the time, throwing in a few sedums and crassulas here and there. Now I like to work with many other varieties to create other looks.
Once a frame has been chosen, it is time to decide what varieties of succulents are to be used. If using rosettes, it will probably take about 130 cuttings to fill the frame. Larger rosettes will reduce the number required, but remember the wire mesh is ½ inch in diameter, limiting the size of stem that will fit through the mesh. I’ve cut the mesh to accept a larger stem when necessary, but mostly work with plant sizes that fit in the mesh.
Preparing Living Picture Frame Cuttings
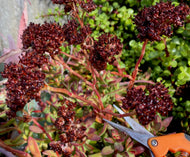
Cuttings are prepared by removing offsets, or stems, of plants like echeveria, sempervivum, sedum and crassula. With rosettes, the diameter might vary from ½” to 2”. The stem is usually cut to ¼” length or smaller. (Rudolf Schulz's book Propagation of Succulent Plants, provides an excellent overview of preparing succulent cuttings).

Cuttings that have been removed from mother plants and still need old leaves to be removed.

Cuttings that have had old leaves removed and are ready for planting.
Prepare enough cuttings to fill the space of the frame to be planted. The cuttings will need to heal, form a scab, for about one week before planting. Store the cuttings in a cool, shaded area in a single layer while healing.
Selecting the Varieties for a Living Picture Frame
As mentioned earlier. I have mostly worked with rosettes such as Sempervivum and Echeveria. My primary reason for this is their ability to confine themselves to small spaces. Most of this is pretty subjective and I encourage the uninitiated to experiment. It’s pretty difficult to go wrong. I like to work with different colors and textures and there are many options with these two families. Sempervivum arachnoideum contrasts well with Sempervivum calcareum. Echeveria secunda is a great contrast with Echeveria ‘Pearl von Nuremburg’.
Planting and Rooting the Cuttings
Once the cuttings have been prepared and have healed, it is time to plant. For soil, use a cactus mix. If you need to make your own mix, use a regular potting mix combined with an amendment like perlite, pumice, or crushed lava. The purpose of the amendment is to increase aeration and drainage. The soil should be lightly moist. Screen the soil through the wire mesh until completely full. Settle the soil by gently tapping the frame on the surface it is sitting on. Add more soil if there is space between the soil and the wire mesh. Do not overly pack the soil. Now you are ready to plant.

I begin by placing the cuttings that I think of as the focal points of the planting.

I finish by filling in with the plants that are more numerous. If you look at the lower left corner, you will see a Crassula corymbulosa. There are three cuttings of this. I decided after laying out all my plants to move these to a different location. This is something you can do depending on what looks best to you. In the next photo, you will see the cuttings in a new location.
Lay out the cuttings filling the planting space. A little space between cuttings, 1/8th to ¼”, is about right to be able to hang your frame in about 8 to 12 weeks. Move the cuttings around until you are happy with the way the plants look together. Remember, the plants are a bit dehydrated at this point and will be even more so until they get their roots and begin to take up water. Check for roots in about 7 to 10 days. Some plants root more slowly, so checking a sample of different varieties is recommended. Once roots are showing on all varieties it is time for your first watering.
Shop for Living Pictures and Living Picture Kits here>>
Watering a Living Picture Frame
The frame does not have any drainage, so water enough to get the soil moist to the bottom, but not soggy. Place the frame in a partial shade/filtered sun, airy environment. It should take about a week to dry out. You can check it much like you would a cake by putting a toothpick in to check moisture level. If in doubt, give it another 2 or 3 days and then water it again. One or two days after the first watering, the plants should look like they are taking the water in with the leaves beginning to fill and look less dehydrated. Now it is just a matter of watering as the soil dries and letting the roots fill the soil in the frame. After about 4 to eight weeks of the roots growing, the plants should be rooted enough that gently tugging does not move the plants. This is referred to as establishing the plants in the container. Once the plants are well established it is time to hang your Living Picture.

In this photo, you can see the cuttings are more vibrant after producing roots and taking in water from their first or second watering.

This is a group of Living Pictures that have been watered for the first time. The cuttings have taken in water through their new roots. You can see the increase in color and that they are less dehydrated.
Where to Hang a Living Picture Frame
This planter has no up or down other than what you might think is up. In other words, you may hang it in whatever direction you want. Some use a picture frame bracket and some hang it on a nail using the edge of the frame. If you are concerned for the wall surface and moisture, then you need to take appropriate measures to protect your wall. Moisture will collect.
The best exposure is filtered sun or partial shade. An eastern exposure is usually sun that has not yet gotten too intense. An overhang, lattice or patio cover, a nearby tree, or some other method of filtering the sun will make it easier to maintain the Living Picture. Too little sun will result in plants stretching for the light and losing their color. Too much sun will make the plants appear to be stressed. Finding the right balance, will allow for the best results.
Living Picture Frame Maintenance
The Living Picture frame is nothing more than a planter. Of course, it is a very specialized planter, made for hanging on a wall. This is vertical gardening and like any other forms of gardening, you need to attend to your plants needs. Maintenance might include pruning, thinning, or even removing unwanted plants. Again, refer to the Rudolf Schulz book, Care of Succulent Plants, for a more detailed description on maintenance.
Fertilizer for Succulents
Succulent plants are very efficient and therefore use less water and fertilizer than most other plants. Also, because you are gardening in a very small space, it is best to fertilize minimally to slow the growth of the plants. I recommend using an all-purpose, water-soluble fertilizer. Only fertilize about once a month and reduce the recommended dose to ¼.
Over time, the plants are going to grow. At some point, you are possibly going to need to prune, thin, or even replant the frame. Like other plants you may have to replace plants that died, remove infestations of unwanted insects, and take care of any maintenance issues that may arise.
Shop for Living Pictures and Living Picture Kits here>>


1 comment
This site was… how do I say it? Relevant!! Finally I have found something that helped me.
Many thanks!
Website: Spartanol assunzione